Such a busy week!! Lots of late nights, and still too far behind!
I teach 15 classes/month, five are this week and I have only done the preparation for two of them. That may not sound so bad, but three of the five are hand stitching. Yikes. Maybe I need to step it up by adding earlier mornings to my late nights!
One reason I am so busy is because of our new venture. We bought a beautiful five bedroom, two bathroom house that we are turning into a retreat center. It is a beautiful home, but it needs a little work, and unfortunately, we closed 7 days later than anticipated.
We already scheduled the open house… which is just 3 weeks away.
![IMG_0591[1]](https://thepenandpatch.files.wordpress.com/2014/05/img_05911.jpg?w=300&h=225)
Does this yard look like it is ready for an open house? Two sore days later, it is starting to look better, even the grass is starting to green up. But we still have to re-tile the bathroom, fix the grout in the kitchen, fix a kitchen cabinet, replace the kitchen sink, put in the bathroom pedestal, install all new appliances, fix some dry wall, paint, install window coverings, shampoo the rugs, clean, and of course, furnish.
In addition, we are making 10 new quilts for all of the beds. Yes, I do have LOTS of quilts. Just none in the size I need!!
Worse yet… I am leaving for quilt market next Monday. Brianna and I will be gone for a week, we’ll get back just four days before the open house for the retreat house.
But I am not panicking. My life is often like this. I just have to slow down and focus. Prioritize and complete thing at a time. My favorite quote is wisdom from India: “To consume an entire elephant, you must take one bite at a time.”
So tonight, I am finishing up a quilt on the machine and working on one of the upcoming classes.
I have three customer quilts to get done before I can start quilting the retreat house quilts. This one is called Log Cabin Garden. It was a block of the month we just finished up. It is flannel log cabin blocks with wool applique. The original pattern had 6 different applique patterns, I drew up 3 extra so we would end up with an 84″ x 84″ quilt.
 This is the original pattern, I added a goose, a saltbox house and a tree (pics tomorrow when it is all the way done). We cut a few more kits after the class due to it’s popularity in the shop. The flannel, pattern (plus the extra three) and all of the wool is just $280. We have three left. It’s a very good price considering the amount of wool that is in the kit. The cat pictured is 14″ tall!
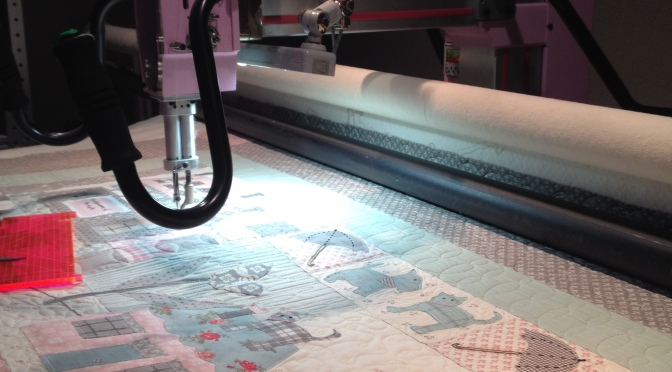
![IMG_0557[1]](https://thepenandpatch.files.wordpress.com/2014/05/img_05571.jpg?w=300&h=225) The hardest part about quilting is the planning. Feathers? Outline? Filler? Edge work? Stencils? Too many options for a busy brain. For this quilt I am going to do a random primitive feather in the border, diagonal lines, echo and a filler.
The hardest part about quilting is the planning. Feathers? Outline? Filler? Edge work? Stencils? Too many options for a busy brain. For this quilt I am going to do a random primitive feather in the border, diagonal lines, echo and a filler.
The feather is the easiest part. I love feathers. I always have to be careful – not everything looks good with feathers on it.
![IMG_0554[1]](https://thepenandpatch.files.wordpress.com/2014/05/img_05541.jpg?w=300&h=225)
I always start with a line. I feather around the line, then stitch my center line last. I think that may be backwards, but if I don’t do it that way, I end up with a very thick, scribbly center.
![IMG_0555[1]](https://thepenandpatch.files.wordpress.com/2014/05/img_05551.jpg?w=300&h=225)
I like primitive feathers, they have separated plumes.![IMG_0558[1]](https://thepenandpatch.files.wordpress.com/2014/05/img_05581.jpg?w=300&h=225) For the diagonal lines I first need to draw the lines. I am using a chalk pen and a basic ruler. I am not guiding the machine along the ruler, I am just using the ruler to mark the lines, one inch apart. I like to use the chacoliner filled with the iron off white chalk.
For the diagonal lines I first need to draw the lines. I am using a chalk pen and a basic ruler. I am not guiding the machine along the ruler, I am just using the ruler to mark the lines, one inch apart. I like to use the chacoliner filled with the iron off white chalk.
![IMG_0559[1]](https://thepenandpatch.files.wordpress.com/2014/05/img_05591.jpg?w=300&h=225)
![IMG_0562[1]](https://thepenandpatch.files.wordpress.com/2014/05/img_05621.jpg?w=300&h=225)
![IMG_0561[1]](https://thepenandpatch.files.wordpress.com/2014/05/img_05611.jpg?w=300&h=225) This was my last picture, but I was actually halfway done when I stopped. I like the way it is turning out. My machine is a trooper. Flannel back, wool batt, flannel top and sometimes three layers of wool. No problem for my 18g needle and 50 wt thread. Full picture tomorrow.
This was my last picture, but I was actually halfway done when I stopped. I like the way it is turning out. My machine is a trooper. Flannel back, wool batt, flannel top and sometimes three layers of wool. No problem for my 18g needle and 50 wt thread. Full picture tomorrow.
On to class prep for A Rainbow Garden. WONDERFUL quilt!! Our new wool block-of-the-month for this year. We just started on our first block.
![IMG_0500[1]](https://thepenandpatch.files.wordpress.com/2014/05/img_05001.jpg?w=225&h=300)
![IMG_0499[1]](https://thepenandpatch.files.wordpress.com/2014/05/img_04991.jpg?w=225&h=300)
This block is wool applique on Diamond Textiles wovens. We’ve added Kathi’s embroidered suggestions and my favorite… beads! I have a bunch of the french knots done, but lots of embroidery left!
But it will have to wait…I have to head to bed. Up early tomorrow to finish the machine quilting, make a pincushion for pincushion club, cut the blocks and type the handout for Prairie Women’s Sewing Circle and piece the shower curtain for the Retreat House.
![IMG_0443[1]](https://thepenandpatch.files.wordpress.com/2014/05/img_04431.jpg?w=225&h=300) Fred is unconcerned with the amount of work that has to be done. He heads to bed by 8pm every night (wish I could do that). He is our blind lab. You’d never guess he was blind. He gets around just fine. His nose is beyond perfect. And no.. that is not a staged picture. He sleeps in the spare room with a pillow, a cat and a teddy. He doesn’t get a quilt… he sheds too much for that.
Fred is unconcerned with the amount of work that has to be done. He heads to bed by 8pm every night (wish I could do that). He is our blind lab. You’d never guess he was blind. He gets around just fine. His nose is beyond perfect. And no.. that is not a staged picture. He sleeps in the spare room with a pillow, a cat and a teddy. He doesn’t get a quilt… he sheds too much for that.
So it’s time for me to make like Fred… and head to bed.
Good night!


![IMG_0750[1]](https://thepenandpatch.files.wordpress.com/2014/05/img_07501.jpg)
![IMG_0823[1]](https://thepenandpatch.files.wordpress.com/2014/05/img_08231-e1401339336157.jpg)
![IMG_0796[1]](https://thepenandpatch.files.wordpress.com/2014/05/img_07961-e1401472517470.jpg)
![IMG_0813[1]](https://thepenandpatch.files.wordpress.com/2014/05/img_08131.jpg)
![IMG_0819[1]](https://thepenandpatch.files.wordpress.com/2014/05/img_08191.jpg)


![IMG_0612[1]](https://thepenandpatch.files.wordpress.com/2014/05/img_06121-e1401090725276.jpg?w=300&h=178)
![IMG_0613[1]](https://thepenandpatch.files.wordpress.com/2014/05/img_06131.jpg)
![IMG_0614[1]](https://thepenandpatch.files.wordpress.com/2014/05/img_06141.jpg)
![IMG_0615[1]](https://thepenandpatch.files.wordpress.com/2014/05/img_06151.jpg)


![IMG_0557[1]](https://thepenandpatch.files.wordpress.com/2014/05/img_05571.jpg)
![IMG_0554[1]](https://thepenandpatch.files.wordpress.com/2014/05/img_05541.jpg)
![IMG_0555[1]](https://thepenandpatch.files.wordpress.com/2014/05/img_05551.jpg)
![IMG_0558[1]](https://thepenandpatch.files.wordpress.com/2014/05/img_05581.jpg)
![IMG_0559[1]](https://thepenandpatch.files.wordpress.com/2014/05/img_05591.jpg)
![IMG_0562[1]](https://thepenandpatch.files.wordpress.com/2014/05/img_05621.jpg)
![IMG_0561[1]](https://thepenandpatch.files.wordpress.com/2014/05/img_05611.jpg)
![IMG_0443[1]](https://thepenandpatch.files.wordpress.com/2014/05/img_04431.jpg)